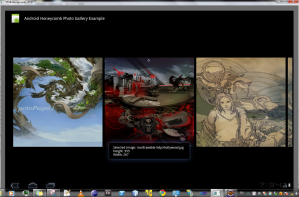
Steps involved in creating Android 3.0 – Photo Gallery :
1. Download the preview release of Android 3.0 using either the SDK download manager (preferred) or from within the Eclipse IDE using Android SDK and AVD manager.
2. Create and AVD to run the emulator
3. Create an Android project (IMPORTANT set the Min. SDK Version to ‘Honeycomb’ ) and Click Finish!
4. Create a main entry point java file eg. Main.java
2. Create and AVD to run the emulator
3. Create an Android project (IMPORTANT set the Min. SDK Version to ‘Honeycomb’ ) and Click Finish!
4. Create a main entry point java file eg. Main.java
import android.app.Activity;
import android.graphics.Bitmap;
import android.graphics.BitmapFactory;
import android.graphics.drawable.Drawable;
import android.os.Bundle;
import android.view.View;
import android.widget.AdapterView;
import android.widget.AdapterView.OnItemClickListener;
import android.widget.Gallery;
import android.widget.Toast;

public class Main extends Activity implements OnItemClickListener
 {
  private static final String tag = "Main";
  private Gallery _gallery;
  private ImageAdapter _imageAdapter;

  /** Called when the activity is first created. */
  @Override
  public void onCreate(Bundle savedInstanceState)
   {
    super.onCreate(savedInstanceState);
    setContentView(R.layout.main);
    setTitle("Android Honeycomb Photo Gallery Example");

    _gallery = (Gallery) this.findViewById(R.id.gallery1);
    _imageAdapter = new ImageAdapter(this);
    _gallery.setAdapter(_imageAdapter);
    _gallery.setOnItemClickListener(this);
   }

  @Override
  public void onItemClick(AdapterView arg0, View view, int position, long duration)
   {
    int resourcId = (Integer) _imageAdapter.getItem(position);
    Drawable drawable = getResources().getDrawable(resourcId);
    Bitmap bitmap = BitmapFactory.decodeResource(getResources(), resourcId);

    Toast.makeText(this, "Selected Image: " + getResources().getText(resourcId) + "\nHeight: " + bitmap.getHeight() + "\nWidth: " + bitmap.getWidth(), Toast.LENGTH_SHORT).show();
   }
 }
5. Create an ImageAdapter.java fileimport android.content.Context;
import android.view.View;
import android.view.ViewGroup;
import android.widget.BaseAdapter;
import android.widget.Gallery;
import android.widget.ImageView;
import android.widget.ImageView.ScaleType;
public class ImageAdapter extends BaseAdapter
{
private Context _context = null;
private final int[] imageIds = { R.drawable.formula, R.drawable.hollywood, R.drawable.mode1, R.drawable.mode2, R.drawable.mother1, R.drawable.mother2, R.drawable.nights, R.drawable.ontwerpje1, R.drawable.ontwerpje2, R.drawable.relation1, R.drawable.relation2, R.drawable.renaissance, R.drawable.renaissance_zoom };
public ImageAdapter(Context context)
{
this._context = context;
}
@Override
public int getCount()
{
return imageIds.length;
}
@Override
public Object getItem(int index)
{
return imageIds[index];
}
@Override
public long getItemId(int index)
{
return index;
}
@Override
public View getView(int postion, View view, ViewGroup group)
{
ImageView imageView = new ImageView(_context);
imageView.setImageResource(imageIds[postion]);
imageView.setScaleType(ScaleType.FIT_XY);
imageView.setLayoutParams(new Gallery.LayoutParams(400, 400));
return imageView;
}
}
6. Create an XML layout file:<?xml version="1.0" encoding="utf-8"?> <LinearLayout xmlns:android="http://schemas.android.com/apk/res/android" android:orientation="vertical" android:layout_width="fill_parent" android:layout_height="fill_parent" android:gravity="center" > <Gallery android:id="@+id/gallery1" android:layout_height="wrap_content" android:layout_width="match_parent" android:spacing="10dip" > </Gallery> </LinearLayout>7. Run the Android app.


Greate post but i need gallery with some photos along with videos in a gridview please help me
ReplyDelete